> For the complete documentation index, see [llms.txt](https://library.zoom.com/llms.txt). Markdown versions of documentation pages are available by appending `.md` to page URLs; this page is available as [Markdown](https://library.zoom.com/business-services/zoom-virtual-agent/pci-pal-integration-for-zoom-virtual-agent.md).
# PCI Pal Integration for Zoom Virtual Agent
Configure PCI Pal Secure Payments for secure-payment-link workflows in Zoom Virtual Agent.
This guide explains how to configure PCI Pal Secure Payments with Zoom Virtual Agent. It covers setup, payment-link configuration, and a voice agent example.
### Overview
The **PCI Pal Secure Payments for Zoom Virtual Agent integration** introduces secure payment capabilities directly into Zoom Virtual Agent, enabling AI-driven payment workflows without human agent involvement.
When a customer interacts with a virtual voice or chat agent and needs to make a payment, Zoom Virtual Agent can invoke the PCI Pal tool to generate a secure payment link. This link is then delivered to customers via SMS or email, or as a link in chat, allowing them to complete the payment on PCI Pal's secure, hosted page.
{% hint style="warning" %}
**Warning**
This integration is designed to work by sending a payment link to the customer, where the customer completes payment via the link in their web browser. This integration doesn't allow the customer to verbally speak or enter their payment card information via Dual Tone Multi Frequency (DTMF) to Zoom Virtual Agent.
{% endhint %}
This allows organizations to automate end-to-end payment journeys within a virtual agent, reducing the need to transfer customers to live agents for payment collection. The virtual agent handles the conversational flow, identifying customers, confirming the amount, and collecting non-sensitive details, while PCI Pal handles the secure payment processing. At no point does the virtual agent receive, process, or store any payment card data.
### Prerequisites
To use this integration, you must have:
* Appropriate licenses for Zoom Virtual Agent (voice and chat).
* A user account with admin permissions to configure Zoom Virtual Agent.
* Access to AI Studio with permission to add integrations.
### Initial Setup
PCI Pal integration for Zoom Virtual Agent requires an integrated app available in **AI Studio**, under the **Integrations** menu. Setup steps follow below.
{% hint style="info" %}
**Note**
You'll find two Zoom Apps in the Zoom App Marketplace for PCI Pal integration. Each app has a different use case.
{% endhint %}
**Option 1:**
[**PCI Pal Secure Payment Solution Contact Centers**](https://marketplace.zoom.us/apps/MxNTkUxtQYSja9I-2YbMwQ): This version enables payment facilitation by human agents in Zoom Contact Center using the Zoom App integration method.
**Option 2:**
[**PCI Pal Secure Payments, Zoom Virtual Agents**](https://marketplace.zoom.us/apps/PlJfA-OkSvGTHAdt82ZF9g): This app enables payment facilitation via Zoom Virtual Agent.
You'll want to install the appropriate app according to the use cases unique to your deployment needs. **You do not need to install both apps unless both payment integrations are required.**
{% hint style="info" %}
**Note**
For the integrations explained in this guide, along with the example use case, you must connect the **PCI Pal Secure Payments, Zoom Virtual Agent** app in AI Studio under Integrations. You do not need to install the app directly from the Zoom App Marketplace.
{% endhint %}
#### Connecting the Integration to Zoom Virtual Agent
1. Browse to [zoom.com](https://www.zoom.com/) and sign in.
2. Navigate to **AI Studio > Integrations**.
3. Scroll to the bottom of the page and click the link to **View all marketplace tools integrations**.
4. Locate the **PCI Pal Secure Payments, Zoom Virtual Agents** app.
4. Click the **Connect** button. You will be asked to provide information about your PCI Pal account to complete the setup.
{% hint style="info" %}
**Note**
PCI Pal can provide you with the configuration information required in the above screenshots.
{% endhint %}
5. Return to **AI Studio > Integrations**. You should see the integration is now connected and ready with an "Active" status.
The PCI Pal integration is now ready to be used by your voice and chat agents.
#### Adding the Tool to a Skill
Zoom Virtual Agent can provide a payment experience to the customer by invoking a tool from within a skill.
{% hint style="info" %}
**Note**
For more information on creating tools and skills for Zoom Virtual Agent, see the Zoom Support article [Creating Zoom Virtual Agent tools](https://support.zoom.com/hc/en/article?id=zm_kb\&sysparm_article=KB0081099).
{% endhint %}
To add the tool:
1. Create a new Virtual Agent or modify an existing one.
2. Create or modify a **Skill**.
3. Press the **/ (forward slash)** key to open the **variable, tool, and skill menu**.
4. Select **Tool**, then scroll down to locate the **PCI Pal marketplace entry**.
5. Select the **PCI\_Pal\_Create\_a\_Payment\_Link** tool from the menu.
6. Give the tool a name and description.
7. Configure the **Parameters and Responses** information.
You can use the information tables found in the following section to configure the tool.
**Parameters**
Parameters serve as inputs to the PCI Pal tool to generate a payment session. Some of these parameters are mandatory while others are optional. Much like other tools you may be using, these inputs can be either:
* Static values
* Mapped from variables
* Collected via LLM
The list of available fields in the following tables represent all potential information that may be required to facilitate payment. The customer must work with PCI Pal and their Payment Services Provider (PSP) to determine which fields are required for their unique scenario.
{% hint style="success" %}
**Tip**
If you're asking the customer to make a payment, it's safe to assume you've already identified who's calling, have checked their order status, and so on. Use additional skills and tools to store this information using global variables for reference within the PCI Pal tool.
{% endhint %}
| Variable Name | Requirement | Description |
| -------------- | ----------- | ---------------------------------------------------------------------------------------------------------------------------------------------------------------------------------------------------------------------------------------------------- |
| `flowId` | Mandatory | The unique flowId for your PCI Pal payment workflow. This number is supplied in your PCI Pal setup guide.
- Note: You must work with PCI Pal to identify the correct ID for the payment journey.
|
| `reference` | Mandatory | A field to apply a custom reference to the payment. This will be included in any payment webhooks in agreement with PCI Pal. |
| `amount`\*\* | Mandatory | The amount to be paid. Supply it in the format specified in your PCI Pal setup guide.
- Note: You only need to specify a value. No currency is needed.
|
| `currency` | Optional | The currency formatted in ISO 4217 format (USD/GBP). This is an optional field. Check your PCI Pal setup guide for specifics or requirements. |
| `firstName` | Mandatory | The customer's first name. You may be requested to send both first and last names of the cardholder in a single field. Check your PCI Pal setup guide. |
| `lastName` | Mandatory | The customer's last name. You may be requested to send both first and last names of the cardholder in a single field. Check your PCI Pal setup guide. |
| `addressLine1` | Mandatory | The first line of the customer's address. Provide this in the format specified in your PCI Pal setup guide. |
| `addressLine2` | Optional | The second line of the customer's address. Provide this in the format specified in your PCI Pal setup guide. |
| `city` | Mandatory | Customer address data. Provide this in the format specified in your PCI Pal setup guide. |
| `state` | Optional | Customer address data. Provide this in the format specified in your PCI Pal setup guide. |
| `zipcode` | Mandatory | Customer address data. Provide this in the format specified in your PCI Pal setup guide. |
| `country` | Optional | Customer address data. Provide this in the format specified in your PCI Pal setup guide. |
| `email` | Optional | The customer's email address. Optional. Provide only if required in your PCI Pal setup guide. |
| `phoneNumber` | Optional | The customer's telephone number. Optional. Provide only if required in your PCI Pal setup guide. The guide will also specify the required number format. |
| `customData1` | Optional | An optional, additional data field. Any data required will be specified in the PCI Pal setup guide alongside the required format. |
| `customData2` | Optional | An optional, additional data field. Any data required will be specified in the PCI Pal setup guide alongside the required format. |
| `customData3` | Optional | An optional, additional data field. Any data required will be specified in the PCI Pal setup guide alongside the required format. |
| `customData4` | Optional | An optional, additional data field. Any data required will be specified in the PCI Pal setup guide alongside the required format. |
| `customData5` | Optional | An optional, additional data field. Any data required will be specified in the PCI Pal setup guide alongside the required format. |
{% hint style="info" %}
**Note**
The `additionalField1`, `additionalField2`, and `additionalField3` fields are placeholders that allow custom values. For example, a customer's PSP may require bespoke flight information such as the origin airport, destination airport, and flight number. These fields offer a way to capture such bespoke information.
{% endhint %}
{% hint style="warning" %}
**\*\*Additional guidance for the `amount`** **field**:
The `amount` field **must** be populated with the amount that the customer will pay.
There are **two elements** to a payment amount that need to be considered: **Currency** and **Value**.
| Currency | Value |
| ----------------------------------------------------------------------------------------------------------------------------------------- | ------------------------------------------------------------------------------------------------------------------ |
| - The currency is based on ISO4217 format (GBP, USD, etc.) and will be configured by PCI Pal within the payment workflow.
| - The payment amount and the format is important and the format will be set by the customer's PSP.
|
| - You do not need to include the currency.
| - The value must be in the correct format.
|
The PSP may require the amount to be defined using the smallest possible unit of measurement, such as pennies, cents, and so on. This helps avoid the possibility of decimal math errors. For example:
* 100 = 100 pence = £1
* 1638 = 1638 cents = $16.38
**You must work with PCI Pal and your PSP to determine how the payment amount will be presented during the payment workflow**.
{% endhint %}
{% hint style="success" %}
**Tip**:
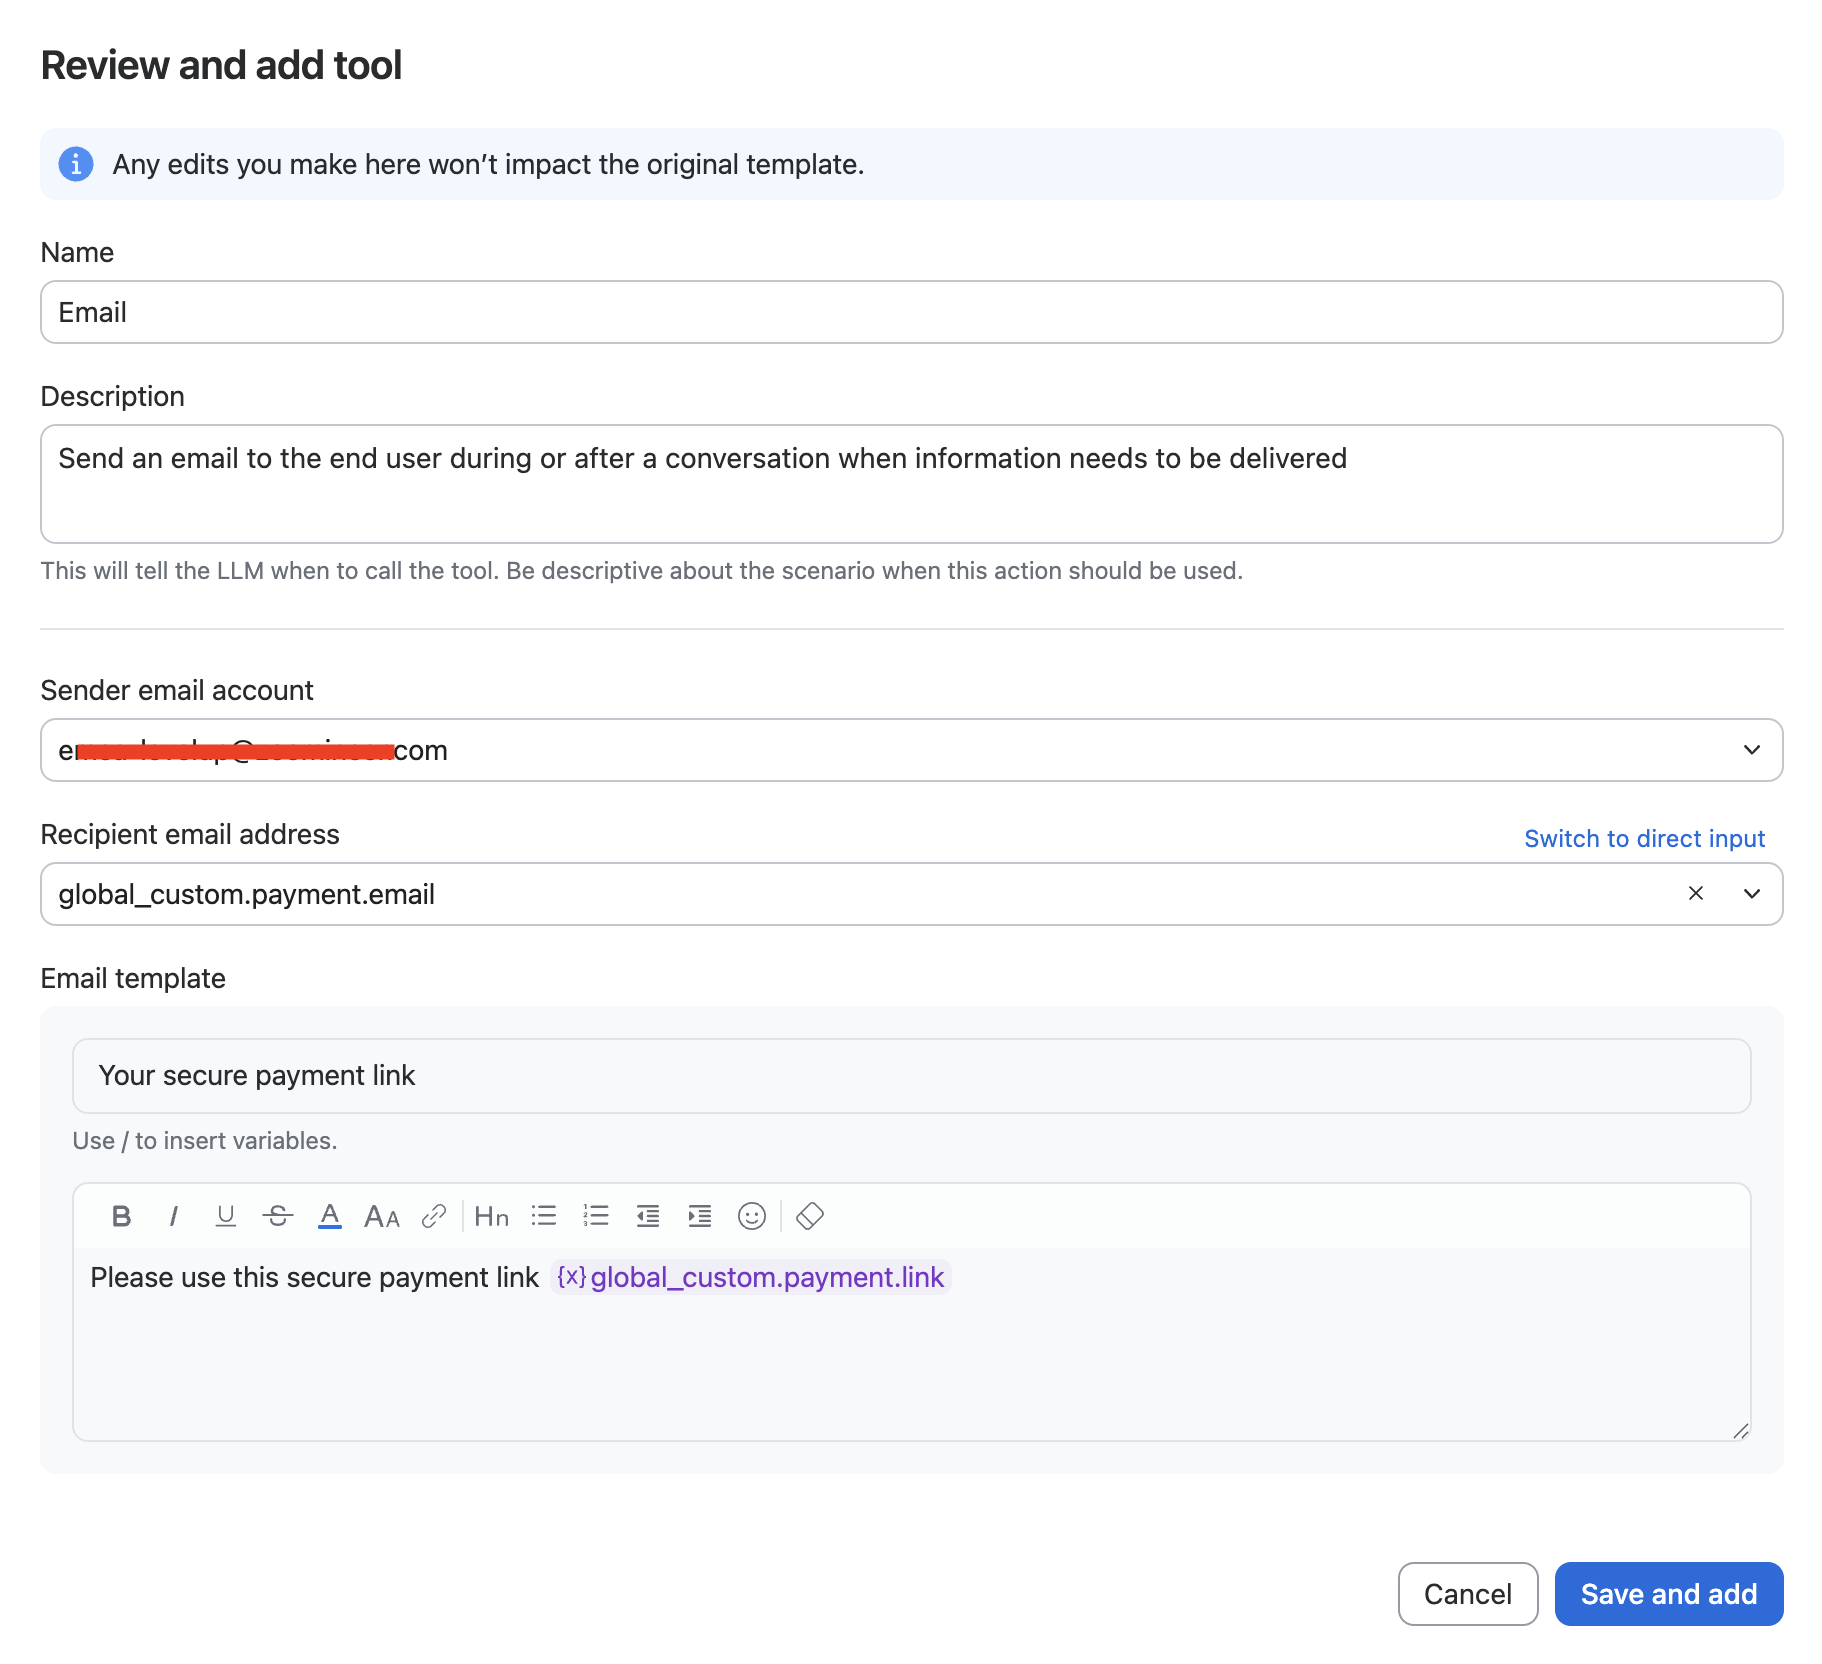
Capturing the customer's phone number and email address facilitates the delivery of the payment link. Combine the PCI Pal skill with the SMS and/or Email tool in to send the link to the customer (particularly useful for voice agent use cases).
{% endhint %}
**Responses**
| Variable Name | Requirement | Description |
| -------------------- | ----------- | -------------------------------------------------------------------------------------------------------------------------------------------------------------------- |
| `Id` | Optional | The unique identifier (GUID) for the generated payment session. This is used primarily for logging and providing it to PCI Pal support for troubleshooting purposes. |
| `LinkId` | Optional | Not required for the current implementation, but included for possible future use. |
| `DigitalSessionLink` | Mandatory | The payment session link |
{% hint style="info" %}
**Note**
The `DigitalSessionLink` field contains the payment link the customer will require. Use the SMS or Email tool to send the link using a phone number or email address captured during the customer contact.
{% endhint %}
### Using the Voice Agent
This section will walk you through a hands-on example configuration of a payment workflow using a voice agent. This walkthrough also applies to Zoom Virtual Agent chat agents.
In this example, the customer is calling to find out where their order is, and the voice agent advises them that the order has been delayed because of an outstanding balance. The agent then provides the customer with the opportunity to settle their balance using PCI Pal's payment workflow.
For this example, you'll need:
* A working SMS configuration in Zoom Contact Center
* An email account attached to Zoom Virtual Agent
* An existing knowledge base repository
{% hint style="info" %}
**Note**
Configuring SMS for Zoom Contact Center, attaching an email account to Zoom Virtual Agent, and setting up a knowledge base are beyond the scope of this document. See [Zoom Support](https://support.zoom.com/hc/en) for more information.
{% endhint %}
#### Creating a Voice Agent
For this use case you'll create a simple voice agent:
1. Log in to the Zoom Admin Center.
2. On the left-hand side of the screen, select **Product configuration > AI Studio > Virtual Agents**.
3. Click the **Add Virtual Agent** drop-down button and select **Instruction based**.
4. Click **Start from blank** in the pop-up window that appears.
5. Create a new **Instruction Based** voice agent, starting from a blank template.
6. Enter the following details in the **Create agent** workflow window:
1. Click the **Chat** modality to deselect it. Only the Voice modality is required in this example.
2. In the **Agent name** text box, enter "Order Agent." Click **Next**.
3. **Guidance**: "You're a friendly agent responsible for helping customers with their orders and payments. APIs will present outstanding balances in pence. When presenting these to a customer you must read them in pounds and pence (e.g., 1000 is £10) but do not modify the value returned by the API." Click **Next**.
4. Select the primary voice and language for your agent from the available options. Click **Next**.
5. Select a knowledge base from the **Use existing source** list. Click **Next**.
6. (Optional) Choose one of the available Skills from the final step of the workflow.
7. Click **Create**.
{% hint style="info" %}
**Note**
A production agent would include comprehensive guidance and guardrails. For this example, the focus is on creating the payment journey. This example agent doesn't include additional guardrails.
{% endhint %}
#### Configuring Global Variables
You'll require several variables to facilitate this use case. Configure these as follows:
1. Log in to the Zoom Admin Center.
2. Navigate to **AI Studio → Virtual Agents**.
3. Click the **Preferences** tab at the top of the screen.
4. Click the **Variables** icon.
5. Create a Custom Variable Group by clicking the **+Add custom group** link at the bottom of the column.
6. Name the custom variable group "**payment**."
7. Click **Add**.
8. Click on your newly created custom group, then click **+Add variable** in the top-right corner of the screen.
9. Create the following variables:
| Variable Name | Type | Value |
| ------------- | ------ | --------- |
| email | String | Undefined |
| phone | String | Undefined |
| link | String | Undefined |
#### Editing the Existing Voice Agent
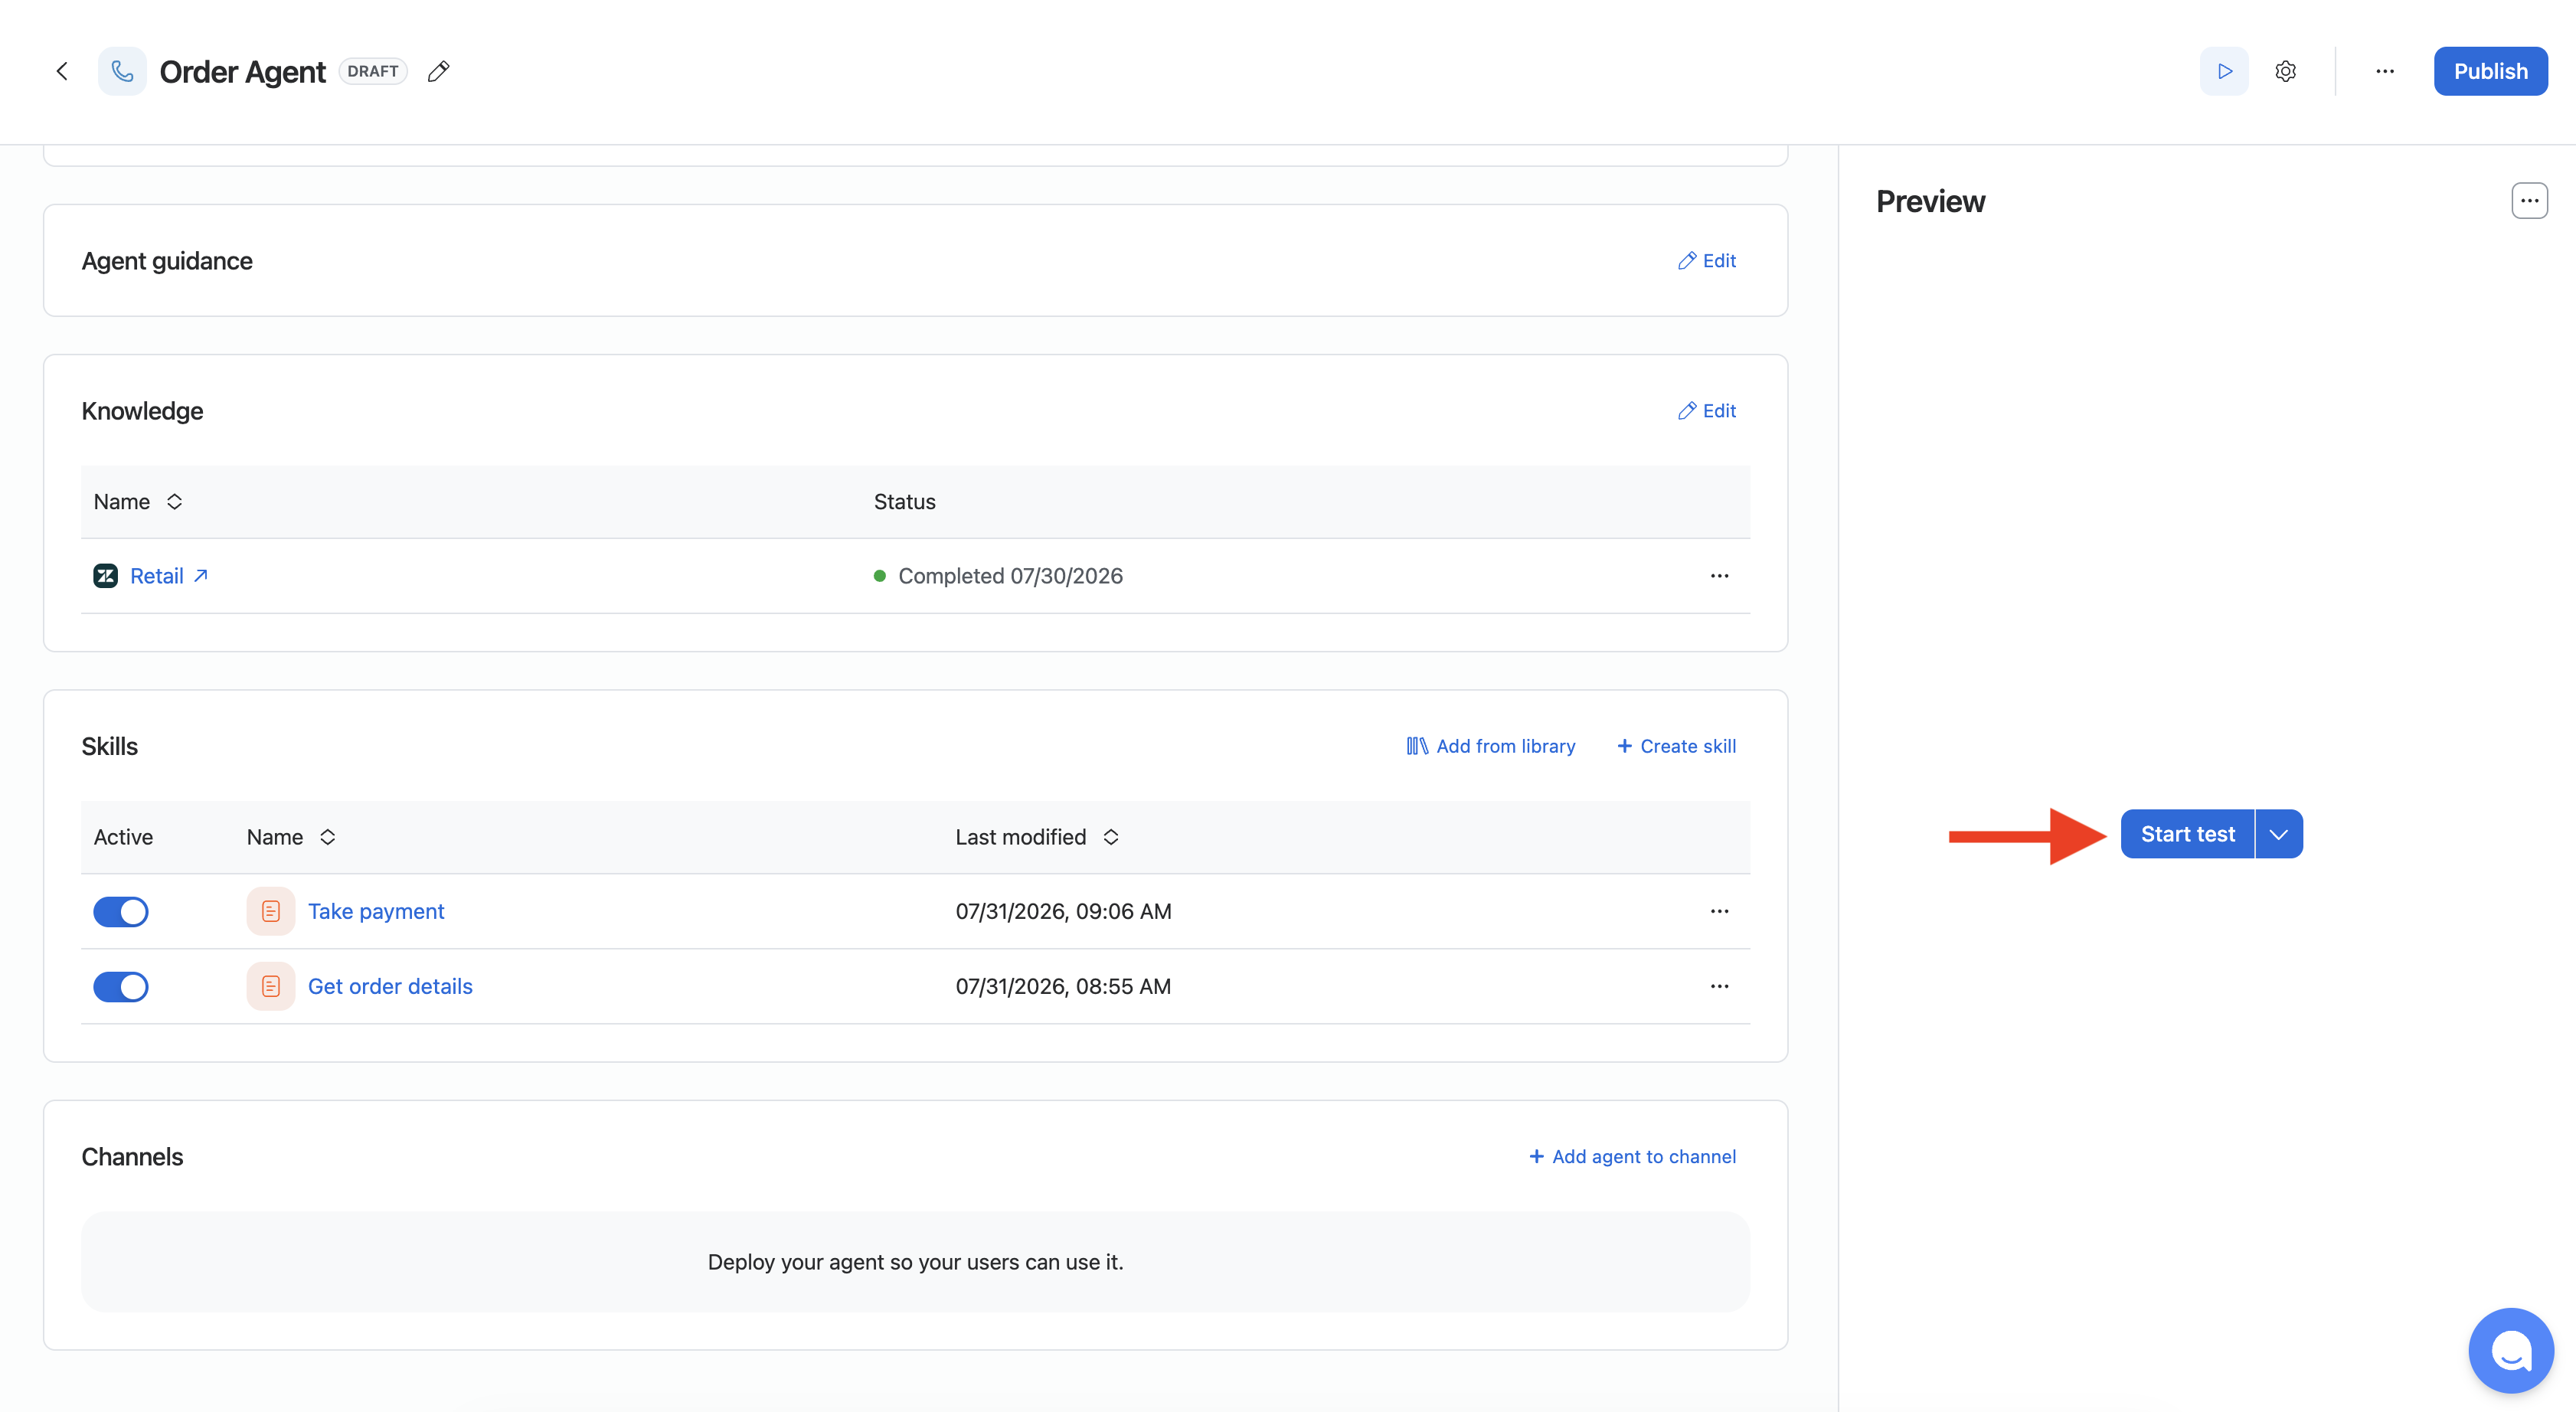
After configuring the variables, you'll need to return to the voice agent and create skills to facilitate order lookup and secure payments.
1. Navigate to **AI Studio → Virtual Agents → Agents**.
2. Modify the voice agent you created earlier.
3. Scroll down to the **Skills** section of the voice agent configuration.
4. Move on to the next sections to create two skills.
**Creating an Order Update Skill**
Next, create a skill to provide customers with information about their recent orders. You'll use static JavaScript code to simulate an API call to return fictitious order information.
1. Click **+Create skill** and create an **Instruction-based skill**.
2. Enter the following details:
1. Name: Get order details
2. Trigger: Use this skill to retrieve information about a recent order
3. In the Instructions window, press the **/ (forward slash)** key.
4. Select **Tool** and click **Create a new tool**.
5. Click **Custom script**.
6. Enter the following details:
1. Name: `get_order_details`
2. Description: To retrieve information about orders
3. JavaScript: Use the code block below:
```javascript
async function main() {
return {
"firstName": "Ben",
"lastName": "Williams",
"deliveryAddress": "71 MidCity Place",
"city": "London",
"postcode": "WC1V 6EA",
"orderStatus": "delayed",
"statusReason": "balance outstanding",
"outstandingBalance": "12557"
}
}
```
This code will simulate an API call, providing details about a fictitious order with an outstanding balance. The information in this response will feed into the parameters configured as 'Collect via LLM' when you create the PCI Payment tool.
7. Click **Create**.
8. Complete the skill's instructions using the following text:
```plaintext
1. Ask the customer for their order number
2. Retrieve the order details
3. Provide information to the customer
```
9. Your skill configuration should look like the following image:
10. Click **Add**.
**Creating a Payment Skill**
Next, you'll create a skill that uses the pre-built PCI Pal Marketplace tool to generate a secure payment link. This sends the link to the customer, who can then provide payment information on the secure payment page.
{% hint style="success" %}
**Tip**
When the Order Update skill identifies an outstanding balance, the virtual agent can automatically invoke this skill.
{% endhint %}
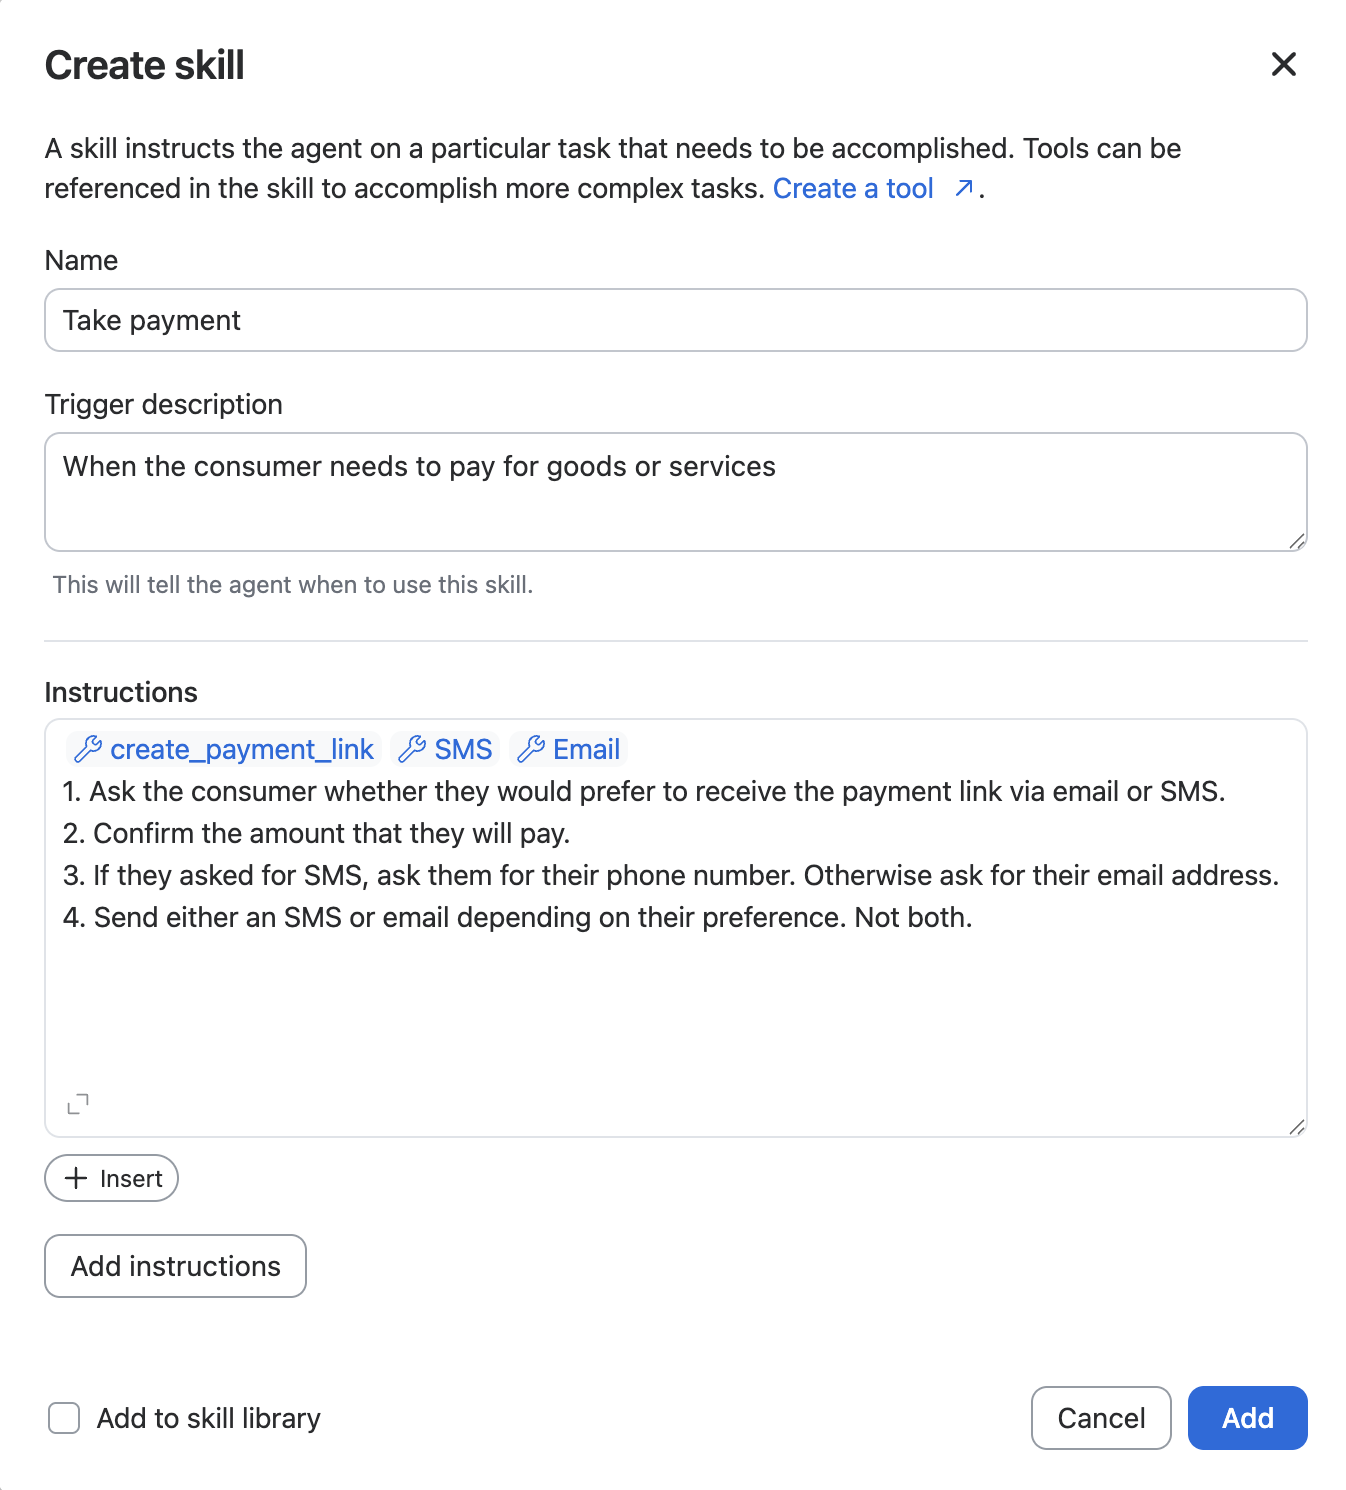
1. Click **+Create skill** and select the option to create an **Instruction-based skill**.
2. Enter the following details:
1. Name: Take payment
2. Trigger: When the customer needs to pay for goods or services
3. In the Instructions window, press the **/ (forward slash)** key.
4. Select **Tool**, and then scroll down to locate the PCI Pal marketplace entry.
5. Select **PCI Pal - Create a Payment Link** tool from the menu.
6. Enter the following details:
1. Name: `create_payment_link`
7. Scroll down to the **Parameters** section.
8. Delete all optional parameters except `addressLine2`, `state`, `email`, and `phoneNumber`, then configure the parameters as follows:
{% hint style="info" %}
**Note**
Any fields not listed in the following table should be deleted from the tool. Unlisted fields aren't required for this use case.
{% endhint %}
| Name | Value Source | Set Value | Value | Map to Variable |
|---|
flowId | Set Manually | Static value | 2213 | N/A |
reference | Collected via LLM | N/A | N/A | N/A |
amount | Collected via LLM | N/A | N/A | N/A |
firstName | Collected via LLM | N/A | N/A | N/A |
lastName | Collected via LLM | N/A | N/A | N/A |
addressLine1 | Collected via LLM | N/A | N/A | N/A |
addressLine2 | Collected via LLM | N/A | N/A | N/A |
city | Collected via LLM | N/A | N/A | N/A |
state | Collected via LLM | N/A | N/A | N/A |
zipcode | Collected via LLM | N/A | N/A | N/A |
email | Collected via LLM | N/A | N/A | global_custom.payment.email |
phoneNumber | Collected via LLM | N/A | N/A | global_custom.payment.phone |
9. Scroll down to the **Response** section.
10. Delete all parameters apart from `DigitalSessionLink` which you should then configure as follows:
1. Description: The unique payment link
2. Map to variable: `global_custom.payment.link`
11. Click **Save and add**.
12. In the Instructions window, press the **/ (forward slash)** key again.
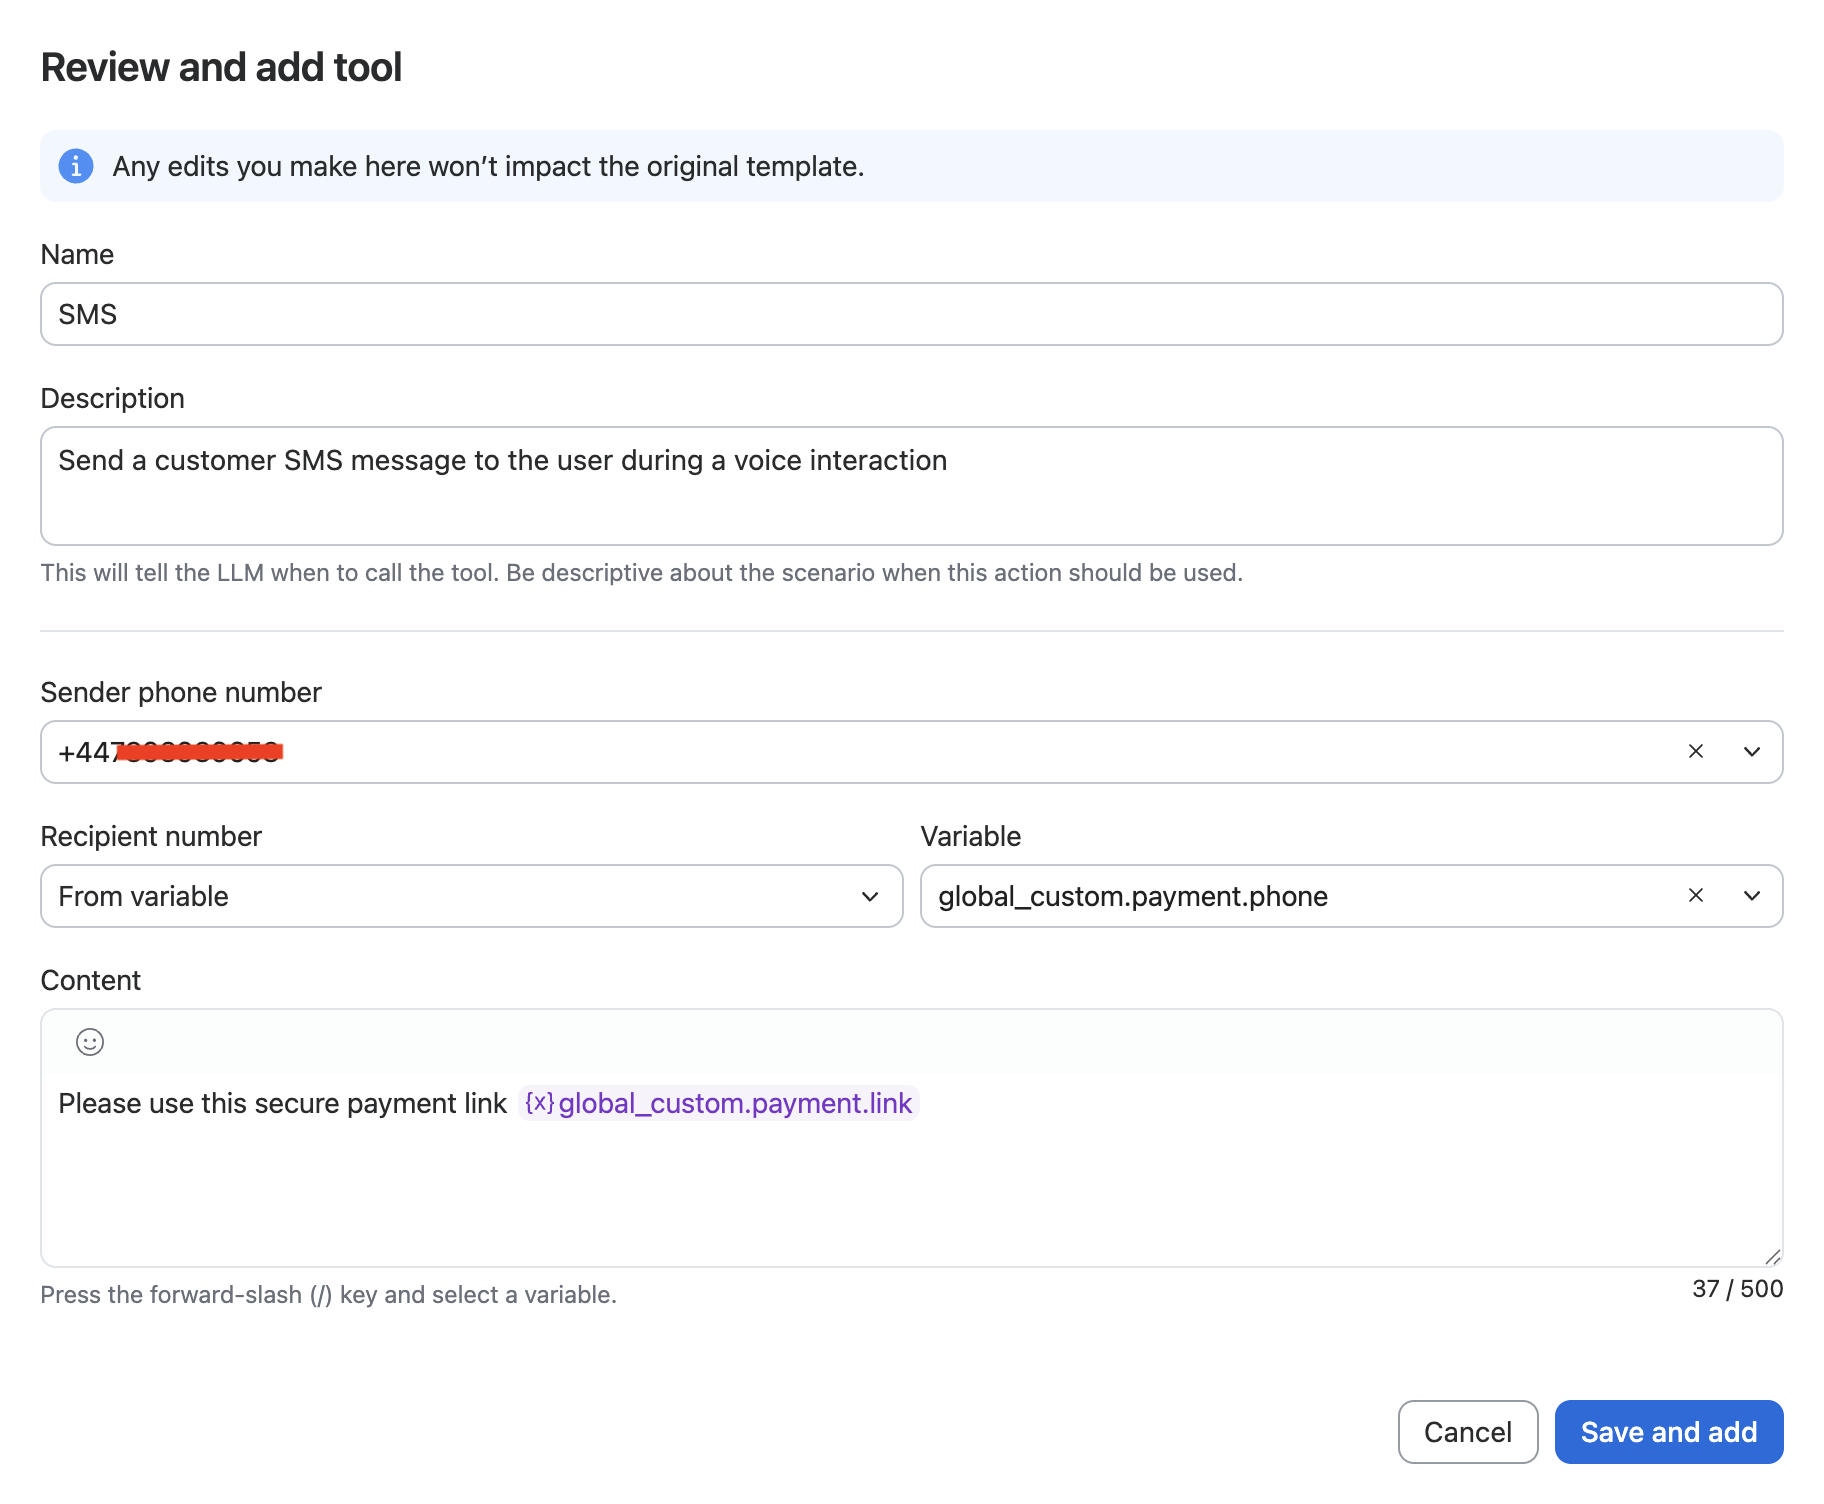
13. Add the **SMS** tool and configure as follows:
1. Sender phone number: Select an appropriate number from the drop-down list.
2. Recipient number: From variable
3. Variable: `global_custom.payment.phone`
4. Content: Please use this secure payment link
1. Press the **/ (forward slash)** key at the end of this string and locate the `global_custom.payment.link` variable.
14. The SMS tool should look like similar to the following image: